Showing posts with label part. Show all posts
Showing posts with label part. Show all posts
Wednesday, February 19, 2014
Rescue Mission Part Three
Ive been writing my way through my adventure repairing a table and single chair owned by a friends grandmother. Something happened that put this piece through the ringer and if you want to survey the original damage and what I had repaired so far you can catch up on all the related posts by checking out HERE.
I had replaced the cleats completely and repaired the leg that had the mounting bolt ripped from it, but the other leg was in a little bit more trouble. It had one of the feet torn from the body.


The foot side of things was easy to take care of. The broken dowels only needed to sawn of flush.

The leg side was a little more complicated. One dowel had been ripped out, chipping out a good amount of the surrounding wood. The best repair I could think of was to remove the broken wood and glue in wood to replace it and bring the surface out to the end of the leg again.

I started to define the sides of the section to be removed with my tenon saw.

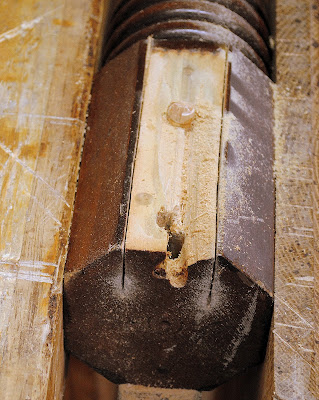
Then I went after it with a chisel and a mallet until I had cleaned out a rectangular section.

Then I used some of the poplar scrap from the cleats and glued a couple strips in place, matching up face grain to face grain. A little glue to set the repair and I left it sit and cure overnight.

The next day, a couple swipes of a plane and the repair was flush with the leg and as good as new.

I drilled for the new dowels but clamping up the feet on the leg was going to be difficult with the curves of the feet. As much as I dislike jigs, I had to cut a couple simple ones to make the clamping go easier. I used some scrap pine and scribed the curves of the feet. A little bandsaw time and the clamping jigs were cut.

With one on each foot, I would have square surfaces to put my clamps on.

I clamped another couple pine scraps above the curved clamping jigs to keep them from sliding up under the clamps pressure.

A little more dry time on the glue and I could attach the cleats to the top of the legs.

Then reattach the legs to the bottom of the table.

Flip the table back over and test to make sure the drop leaf mechanisms work well and we can call the table done.

But I still had the chair to worry about.
Ratione et Passionis
Oldwolf
Read More..
I had replaced the cleats completely and repaired the leg that had the mounting bolt ripped from it, but the other leg was in a little bit more trouble. It had one of the feet torn from the body.
The foot side of things was easy to take care of. The broken dowels only needed to sawn of flush.
The leg side was a little more complicated. One dowel had been ripped out, chipping out a good amount of the surrounding wood. The best repair I could think of was to remove the broken wood and glue in wood to replace it and bring the surface out to the end of the leg again.
I started to define the sides of the section to be removed with my tenon saw.
Then I went after it with a chisel and a mallet until I had cleaned out a rectangular section.
Then I used some of the poplar scrap from the cleats and glued a couple strips in place, matching up face grain to face grain. A little glue to set the repair and I left it sit and cure overnight.
The next day, a couple swipes of a plane and the repair was flush with the leg and as good as new.
I drilled for the new dowels but clamping up the feet on the leg was going to be difficult with the curves of the feet. As much as I dislike jigs, I had to cut a couple simple ones to make the clamping go easier. I used some scrap pine and scribed the curves of the feet. A little bandsaw time and the clamping jigs were cut.
With one on each foot, I would have square surfaces to put my clamps on.
I clamped another couple pine scraps above the curved clamping jigs to keep them from sliding up under the clamps pressure.
A little more dry time on the glue and I could attach the cleats to the top of the legs.
Then reattach the legs to the bottom of the table.
Flip the table back over and test to make sure the drop leaf mechanisms work well and we can call the table done.
But I still had the chair to worry about.
Ratione et Passionis
Oldwolf

Monday, February 10, 2014
Petersburg MI Making a Mantle Part V
Im on the final touch up coats on the mantle, but here are some pictures of the backside of the mantle and the corbles.
You can see that the backside of the mantle is unfinished, but I have the french cleat installed. You can now better understand how this cleat works. The opposing piece will be screwed to the wall, and will provide a good amount of support for this heavy piece! The corbles will do the rest of the support work, and the mantle wont move.
The mantle is scheduled to be installed tomorrow!


Read More..
You can see that the backside of the mantle is unfinished, but I have the french cleat installed. You can now better understand how this cleat works. The opposing piece will be screwed to the wall, and will provide a good amount of support for this heavy piece! The corbles will do the rest of the support work, and the mantle wont move.
The mantle is scheduled to be installed tomorrow!
Monday, January 27, 2014
The Ply Wooden Boat Part I Conception of a Crazy Idea
In September of 2011 Marc Spagnolo blogged about the plywood boat they made on GardenFork.tv. Entrigued, I watched the GardenFork.tv video and fell in love the idea. How could I say no to making a simple, functional boat out of nothing but plywood, screws, caulking and some very simple carpentry tools?

I couldn’t. So, I decided it would be the perfect family activity for our annual vacation in Lake George the following August.
My plan was to pack a tool bag with the smallest tool kit possible. Then, once we were up at Lake George, I would buy the material locally, build the boat, use it in the lake and then scrap it when we were ready to go home.
In order to determine the tool kit (I didn’t want to be short a needed tool or schelp unnecessary tools to and from Lake George) I first set about building a mock plywood boat.
For the mock boat I used a sheet of ¼” luan plywood and some 1x3 as battens. I used my Makita 6½” 18v Li-Ion saw with a Freud ATB framing blade. I marked line with a chalk line and then cut them by eye. I screwed the whole thing together using Kreg screws so I wouldn’t have to pre-drill anything.
With the mock boat constructed, I packed up my Makita saw, my 12v drill, a chalk line, some clamps, a cheap plastic framing square, my Kreg screws and a handful of other small tools. I had the basic build figured out. It was time to go on vacation and build the actual boat.
Before I get too far into my odyssey, heres the video that started me on my way.
Read More..
My plan was to pack a tool bag with the smallest tool kit possible. Then, once we were up at Lake George, I would buy the material locally, build the boat, use it in the lake and then scrap it when we were ready to go home.
In order to determine the tool kit (I didn’t want to be short a needed tool or schelp unnecessary tools to and from Lake George) I first set about building a mock plywood boat.
For the mock boat I used a sheet of ¼” luan plywood and some 1x3 as battens. I used my Makita 6½” 18v Li-Ion saw with a Freud ATB framing blade. I marked line with a chalk line and then cut them by eye. I screwed the whole thing together using Kreg screws so I wouldn’t have to pre-drill anything.
 |
| Much of my tool kit (and the boat making materials). |
Before I get too far into my odyssey, heres the video that started me on my way.
Sunday, January 26, 2014
Petersburg Mi Making a Mantle Part VI
The mantle is finally installed, and it looks beautiful! Here are the installation pictures...
The first is a picture of the corbles being installed. The corbles have two mounting screws on the backsides. They will take some of the weight. Ive added an additional 3" screw through the top of the corbles to help with some of the "pull" of the mantle.
I then measured and marked for the wall portion of the french cleat and installed it. After that, the mantle simply slid right into place! Because of the way I set up the cleat initially, I was able to adjust the mantle left and right as needed!
The next step will be to finish off the surrounding trimwork. I have about 3-4 days left on this project and I will be finished!!!


Read More..
The first is a picture of the corbles being installed. The corbles have two mounting screws on the backsides. They will take some of the weight. Ive added an additional 3" screw through the top of the corbles to help with some of the "pull" of the mantle.
I then measured and marked for the wall portion of the french cleat and installed it. After that, the mantle simply slid right into place! Because of the way I set up the cleat initially, I was able to adjust the mantle left and right as needed!
The next step will be to finish off the surrounding trimwork. I have about 3-4 days left on this project and I will be finished!!!
Friday, January 24, 2014
Box Making 101 Part I
Heres how I make simple but decorative boxes - I am making two that will be Christmas gifts this year.
I am using a piece of cherry, and have prestained it to make the whole process a little easier. Ive run it through the router on both sides to make a 1/4" dado joint that will receive the top and bottom panels.
Ive made two blocks, one short and one long. These marking blocks represent the sides and front and back lengths of the box, and make it easy to not have to measure for my lengths.
I cut all the sides in a continuous series out of the wood, so that the grain pattern will follow around - matching up the grain on the corners looks pretty cool!
Then, I located and cut biscuit slots with the biscuit jointer. Ive glued the corners and inserted the top and bottom panels, and secured the box with a strap clamp, making sure it is square.
After this dries, I will cut the lid off on the table saw, and secure the top to the lid...


Read More..
I am using a piece of cherry, and have prestained it to make the whole process a little easier. Ive run it through the router on both sides to make a 1/4" dado joint that will receive the top and bottom panels.
Ive made two blocks, one short and one long. These marking blocks represent the sides and front and back lengths of the box, and make it easy to not have to measure for my lengths.
I cut all the sides in a continuous series out of the wood, so that the grain pattern will follow around - matching up the grain on the corners looks pretty cool!
Then, I located and cut biscuit slots with the biscuit jointer. Ive glued the corners and inserted the top and bottom panels, and secured the box with a strap clamp, making sure it is square.
After this dries, I will cut the lid off on the table saw, and secure the top to the lid...
Shop Tour Mike Pekovich Part III
With the description of Mike Pekovichs Shop done, we now bring the tour, hosted by the man himself.
Read More..
If you missed Parts I & II of the Mike Pekovich Shop Tour series, you can find them here.
Subscribe to:
Posts (Atom)